


We need to take screenshots almost every time to quickly save any information shown on any webpage or screen through pictures. But, How to Take a Scrolling Screenshot in Windows 10? There is no substitute for screenshots to protect precisely what is seen on a computer or mobile phone screen.
There are currently built-in tools for taking screenshots on smartphones or computers, especially Windows. Any screenshot can be quickly taken using it. However, many of us do not know precisely How to Take a Scrolling Screenshot in Windows 10.
For those of you who still don’t understand what a scrolling screenshot is.
What is a Scrolling Screenshot?
Simply put, a scrolling screenshot is more of a screenshot than what you see on the screen.
This means that if the length of the content displayed on the screen is a little longer, we always need to scroll down the page to see outside the visible part. This is especially true for web pages or documents. Regular screenshots only take pictures of the amount that can be seen on the screen at the moment. It is not possible to take photos of the top or bottom part.
But scrolling screenshots allows you to scroll while taking pictures of the screen so that any content, especially a whole part of a document or webpage, or as many pictures as you want. In the case of ultra-wide monitors, scrolling screenshots is a beneficial thing.
Knowing what a scrolling screenshot is, let’s get into the main discussion of how to take a scrolling screenshot in Windows 10.
How to Take a Scrolling Screenshot in Windows 10 – 3 Easy Ways
Needless to say, the text is not really tutorial typewriting. Instead, it will be a lot like software reviews. Today I will talk about three software that can take scrolling screenshots in Windows 10. So if there is any problem to understand somewhere, you must comment.
Way No 01: Take a Scrolling Screenshot in Windows 10 Using “FastStone Capture“
The tool I use to take all kinds of screenshots, including scrolling screenshots, is FastStone Capture. No software is usually perfect or has all the benefits do. But if there is any software close to perfect for taking screenshots, it is FastStone Capture.
Download: FastStone Capture
I am not talking about its features but its disadvantages. That is, it is a paid software. The price is only $19.95. However, you can download the one-month free trial from the link below. It has a portable version as well as a setup version.
You can take various screenshots, including scrolling screenshots, with a single click from a straightforward interface. This will take you to an essential photo editing window after taking a screenshot. If you do not need to edit, save the image by clicking the save button.
Just a little wait with the mouse cursor over each icon of the small interface to see what works. So I’m not going to go into detail about this anymore. The software also has a screen recording system. As a result, with this software of 3 and a half megabytes, you can easily create any tutorial video if you want!
May You Like: 6 Ways: How to Screenshot on Samsung Galaxy A11?
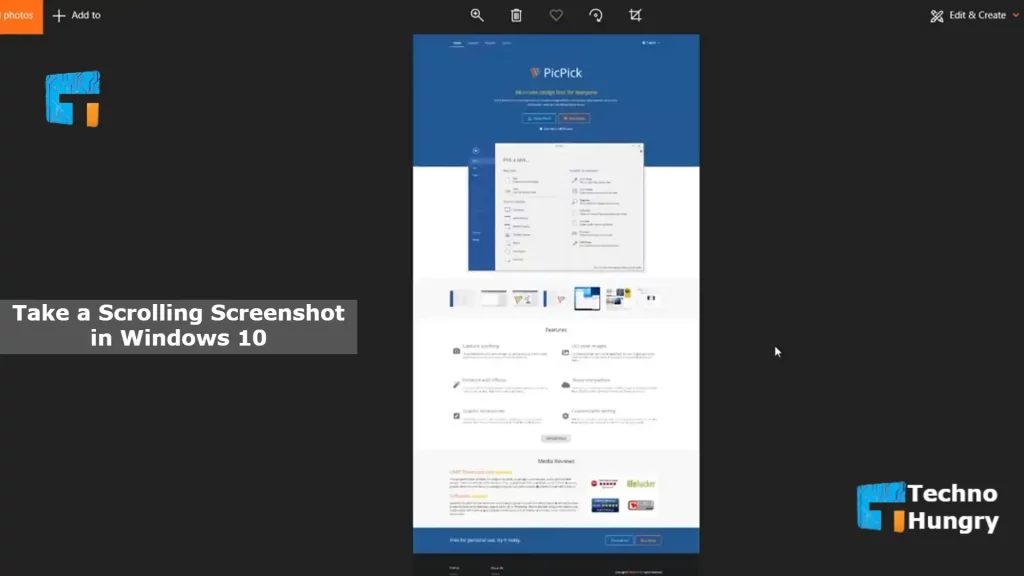
Way No 02: Take a Scrolling Screenshot in Windows 10 Using “PicPick“
This is also an excellent software for taking screenshots. If you do not want to spend money, then you have to choose this 14 MB PicPick. After installing, you may be a little surprised to see its user interface, like Microsoft Word 2016. However, you can find all the options for taking screenshots or editing pictures here. Everything is very nicely given here.
Download Free: PicPick
Clicking on the Scrolling Window option will automatically scroll through the part of the screen that you want to take a scrolling screenshot. Then, like FastStone Capture, it will take you to its essential photo editing tools, from where you can save the image.
FastStone Capture has almost all the benefits except screen recording. Even the floating interface.
Way No 03: Take a Scrolling Screenshot in Windows 10 Using “Snagit“
Snagit is the most popular software in both screenshot and screen records. However, it crashed several times during use, so I did not like it very much. But it can also be a problem with my computer. The size of the software seemed too much to me; About 300 megabytes. Lots of using radar too. Not suitable at all for low config PCs.
Download Free for 15 Days: Snagit
However, the PC configuration is exemplary. Those who feel comfortable using the work software with a beautiful interface can definitely try it. This software, which is much more feature-rich than the other two, will be liked by the users up to a trim level.
You can download the 15-day trial version for free from the link below. Besides, you can buy different packages at different prices after the trial.
Also Read: How to Delete Data and Pictures of the Stolen Smartphones?
Apart from the above three software, you can also take scrolling screenshots in Windows 10 from Google Chrome or Firefox. However, only the scrolling screenshot of the page shown in the browser, i.e. the webpage, can be taken. To do this, click on the menu icon in the upper left corner of Firefox and click on Library → Screenshot. And for Chrome, you have to download the Screen Capture (by Google) extension.
So, you just know about How to Take a Scrolling Screenshot in Windows 10? If you have any problem taking a Scrolling Screenshot in Windows 10, share it with me in the comment section. I will try to give you a perfect solution to your problem. If you find tind post informative, then share it with your friends and family.