


How to Make a Bootable USB on Windows, Linux & OS X? In recent times the size of the computer is getting smaller and smaller. Smaller versions of laptops such as netbooks are also coming to market. These computers are as convenient to carry as they are comfortable to use.
However, the problem with these devices is that they do not usually have an optical drive, i.e., DVD ROM. That is why there is a lot of trouble in setting up the operating system (OS).
However, you can quickly get rid of this problem. With a pen drive, you can easily set up any operating system from Windows XP to any operating system, including 8, 8, 10, and 11. For this, first, you have to boot the pen drive.
People who use computers regularly may be familiar with the terms boot/bootable. If you want to install a new operating system on your computer, you have to either buy a disk from the market and install it or boot the pen drive.
The word bootable disk means a CD / DVD ROM containing an operating system. Which is capable of taking load from the computer’s main memory or RAM. The same thing happens with pen drives.
Nowadays, Windows or Linux (Ubuntu, Mint, Ink, etc.) can be easily installed on a computer by downloading the .iso file of the operating system from the Internet and booting the pen drive rather than buying a CD from the market.
What is Pendrive Bootable?
A bootable pen drive is a disk that allows the operating system to be easily installed. Or it is possible to run live boot efficiently. Because all Windows files are stored in a bootable pen drive. We can boot any pen drive using a 3rd party tool.
However, bootable pen drives can be booted live for the Linux operating system. This is called Live USB. And the funny thing is, you can use this operating system directly without having to install it. However, the problem is, if you download or install a program, it is temporarily stored in the pen drive.
As a result, you will lose all data as soon as you turn off the computer. So work a little more carefully. Maybe the files are beneficial for you!
Necessary Materials to Make a Pendrive Bootable
- A computer or laptop
- Bootable software (with which I will bootable the pen drive) and
- Windows ISO file or a CD (you can get it online or by contacting any computer store)
- A pen drive (which will be bootable)
How to Make a Bootable USB on Windows, Linux & OS X?
With the size reduction, some limitations are also being created. For example, today’s ultrabooks usually do not have an optical disk drive. The reason is that the laptop becomes a little thick.
That’s why many people have problems, especially when installing new operating systems. But if it was a huge problem, then all these reputed companies would never make laptops like this.
In fact, it is not a problem. CDs or DVDs are bootable media, but you can also use pen drives and memory cards as bootable devices.
How to Make a Bootable USB on Windows?
Method 01: Bootable Pendrive with Windows command.
Connect your pen drive to your computer before starting this procedure. This method is applicable for Windows Vista, 7, 8, and 10.
First, you need to run the command prompt as the system administrator. In that case, open the start menu and type cmd. You will see the Command Prompt app. Click on the right button and click on Run as Administrator.
If your system administrator has provided a password, it will ask for a password. If you input the password, you will get the following screen.
- Type disk part, and then the text can be seen here c: \ windows \ system32 \ disk part and press Enter.
- Now type list disk in DISKPART> and press Enter.
- Now you can see the drives of your computer. You can also see the USB drive where the pen drive is attached.
- In DISKPART> then type like image select disk #. Enter your disk number in place of this # sign. Then the following screen will appear.
- Your typing option will stop again by going to the new DISKPART>. Type clean and press enter.
- Then delete all the data from the existing pen drive on your USB drive and clean it, and the option to type again will come to DISKPART>. Type create partition primary and press Enter again. Then the following screen will appear.
- Again you have to select the new partition. DISKPART> then type select partition 1 and press Enter. The following screen will appear.
- Again in DISKPART> type active and press enter. You will see a screen like below.
- Again type the command in DISKPART> format fs = fat32. However, pressing Enter again will take some time to process the program. At the end of the work, the following screen will appear.
- Enter the command DISKPART> Assign and press Enter at the end of the type exit disk management program. USB drive bootable is complete.
- Now you can copy-paste all the installation files of your operating system or bring it by drag & drop.
Method 02: How to Make a Bootable USB with Power ISO software?
Today’s discussion will show you How to Make a Bootable USB with Power ISO software. If you want to give Windows with a pen drive, you need to make a Pendrive Bootable.
You can download and install Power ISO software on your computer to make an ISO file bootable pen drive using Power ISO software.
Go to any browser to download Power ISO software,
- Type Power ISO
- Press Enter or Click on this link
You will get a link to download Power ISO software. There are free and paid versions of Power ISO software. Let’s know How to Make a Bootable USB with Power ISO free software.
How to Make a Bootable USB with Power ISO free software?
- Open the newly installed Power ISO software to make a bootable pen drive.
- Now click on Continue unregistered text. After clicking, you will go to the next step.
- From there, click on the Tool text menu. Clicking will bring out several options at the bottom.
- From there, click Create bootable USB drive. After clicking there, a tab will open.
- There is a saying that the pen drive needs administrator power to boot. To do so, click on the OK button.
- After clicking OK, wait a minute, a new window will appear.
- Now click on Continue unregistered text from there. You will move on to the next step.
- A new window will open here. From that window, you have to select, see what kind of ISO file you will bootable in the pen drive. Maybe windows 10, windows 7.
- Note: The ISO file to boot the pen drive must be on your device. I will show the Windows 10 ISO file as a pen drive bootable.
- Now click in the input cell, after clicking select ISO file from there.
- Now put the pen drive that you will bootable on the computer.
- Note: I am recommending 8 GB pen drive is good and leave the pen drive empty. Because your Pen Drive will be formatted while booting the pen drive.
- Once the ISO file is selected, click the Start button.
- Then click on the OK button. You will see that the process of booting your pen drive will start.
- When the pen drive bootable is complete, the text of success will come out. According to the above rules, you can quickly boot the ISO file using Power ISO software.
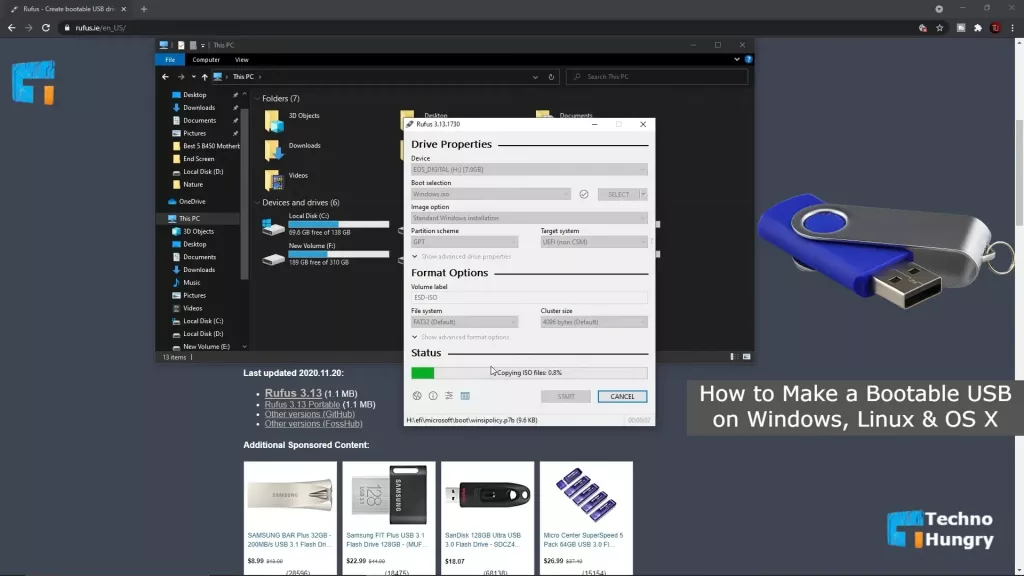
Method 03: How to Make a Bootable USB with Rufus free software?
The tool we will use here to boot the pen drive is Rufus. If it is installed on your PC, open it. If not, download it from here.
So let’s see How to Make a Bootable USB with Rufus free software?
- First, download the software from the link above (skip this step if you already have one).
- Now double click on Rufus-3.15.exe or right-click the mouse and press Run as administrator.
- Then a window like below will appear in front of you. Take a good look at where it is!
- Then connect your pen drive (which you will bootable) to the computer. Interestingly, Rufus will automatically detect the pen drive as soon as it is connected. You will see it in the Device option.
- Now show the ISO file on your computer’s hard drive from the Boot Selection’s Select Option.
Note: If you do not have the ISO file for Windows, at first download, [Windows 10], [Windows 8.1], and [Windows 7].
- After checking everything, click the Start button. Then what else! There is no need to do anything; just wait a while.
- After about 30-45 minutes, you will successfully calculate the pen drive as a bootable pen drive.
Best free Software to Boot the Pendrive for Windows
There is also a lot more free software to boot the pen drive. The list is given below. Be aware. See if you need any time.
How to Run a Bootable Pendrive in Windows?
Curiosity about how to give Windows through a pen drive after booting. But it has already come to your mind.
Then,
- To run the bootable pen drive, you will first need to connect this pen drive to the computer.
- Press the specific button to go to the boot option. For different models of computers, the boot menu is attached to other controls.
But there are a few things in common,
- HP – F9 / Esc
- Dell – F12
- Lenovo – F8 / F10 / F12
- Toshiba – F12
- Asus – F8 / Esc
- Acer – F9 / F12 / Esc
- Samsung – F2 / F12 / Esc
- Sony – Esc / F10 / F11
- 3. Now select your pen drive as the first boot device from the boot option. And select the hard drive as the second drive.
- 4. Then exit by Save & Exit or press F10 from the keyboard, select Save & Exit, and press Enter.
Diameter! Your work is almost finished. Now, wait. Windows will start loading faster.
Also Read: How to Highlight Active Columns and Rows in Excel?
How to Make a Bootable USB with Linux Operating System?
Method No 01:
No separate software is required for Linux. It is possible to make a bootable disk with a terminal. To make a bootable disk, first, insert the pen drive into a USB port. Then open the terminal and give the command.
$ lsblkShow all disk drives attached to your PC. Remember your pen drive disk block/dev /sdxn here. Here x is any letter and n is any number like 1,2,3. . Then give the command.
$ sudo umount /dev/sdxn
$ sudo dd if="/path/to/your/file.iso" of=/dev/sdx
You can also set the block size, in which case you will give your block size with bs at the end. If you want to make the block size 1 MB, then the command will be
$ sudo dd if="/path/to/your/file.iso" of=/dev/sdx bs=1MAfter the process is complete you will see the process info.
Method No 02:
If you do not like using the terminal, you can use GNOME MultiWriter. Open the terminal and issue the command to install GNOME MultiWriter.
$ git clone https://github.com/hughsie/gnome-multi-writer.git
$ ./autogen.sh
$ make
$ sudo make install
Open GNOME MultiWriter from the application launcher, first open the ISO image by clicking on Import ISO.
Then insert the pen drive and click the Start Copying button.
A significant advantage of this is that you can burn ISO to multiple pen drives simultaneously.
You can also use UNetbootin.
How to Make a Bootable USB with OS X?
Method No 01:
The process of OS X is almost the same as Linux, but the command is a little different. Open the terminal and give the command
$ diskutil listA list of all disk drives will appear. Remember the block on your pen drive. For example/dev/diskn; Here n is any number, such as 1,2,3 ……. Then give the command
$ sudo diskutil unmountDisk /dev/diskn
$ sudo dd if="/path/to/your/file.iso" of=/dev/diskn
You can also set the block size, in which case you will give your block size with bs at the end. If you want to make the block size 1 MB then the command will be
$ sudo dd if="/path/to/your/file.iso" of=/dev/diskn bs=1048576The running process will not show. But if you want to see the info of the process, you can press Control+t.
Method No 02:
If you do not like the terminal, you can use UNetbootin. Click on the button below to download UNetbootin.
After downloading, copy it to the application directory. Then open. Will ask for the password before opening. Give the password. Open your file by clicking on the disk image check box below, typing your image, and clicking on the three-dotted buttons. Then type disk and select drive down, and press OK.
There are also several other software, but most of them have failed, at least in my case. But does it take anything else to have a terminal?
Also Read: Step by Step: How to install Windows 11 on a Laptop or PC?
Hope you enjoy this post about “How to Make a Bootable USB on Windows, Linux & OS X”. If you like this then don’t forget to share it with your friends. If you have any questions, share them with me by comment.

